Clougha Pike, Forest of Bowland, Lancashire, Summer
The last few weeks have been… tough.
The last few weeks have been… tough.
Not long after our hike to and around Stockghyll Force, I managed to acquire some form of vertigo for a few days, which was decidedly unpleasant. The following week, my lovely Lisabet came down with a rather nasty summer cold, and I managed to fall down the stairs, spraining my wrist and severely bruising my butt. Then the week after, I caught Lisabet’s cold.
Yeesh.
Finally though, we were both fit and healthy, ready to get back out in nature. Following wise counsel from our nature expert friend, Andrew, we embarked on a completely new hike for us: the Clougha Pike circular.
Clougha Pike is the westernmost summit in the Forest of Bowland Area of Outstanding Natural Beauty. Many peaks in the Forest of Bowland are gristone fells surrounded by heather-covered peat moorland, blanket bog, and deep wooded valleys. Clougha Pike is no different, though its southern face drops away dramatically to the valley floor, and is clearly visible from most areas around Lancaster.
I ended up being in rather a lot of pain for this 10km hike. For reasons unknown to me, I slowly developed a blistering headache as the hike went on. This was paired with a sore neck (from having to look down at my footing a lot), sore knees (an every day occurrence), and painful feet (soles in my boots are now too thin).
Oh also, around the lower areas of the walk, having to deal with all the sheep flies and deer flies.
Despite all of this, the hike was gorgeous. The heather was in full bloom, covering the land and fells in carpets of mauve flowers. We were also experiencing the tail end of Storm Betty, so the higher we ascended the more the 50 mph winds punched our bodies.
All in all, it made for an epic day, and crackin’ photos.
Photos taken on my Sony α7ii using my Sony FE 28–70mm f3.5–5.6 OSS zoom lens. RAWS developed in Lightroom for iPad using RNI Films’ Fortia SP film emulation, then finalised in Affinity Photo 2 for iPad.
Clougha Pike, Forest of Bowland, Lancashire, Summer by Ian Cylkowski is licensed under CC BY-NC-SA 4.0![]()
![]()
![]()
![]()
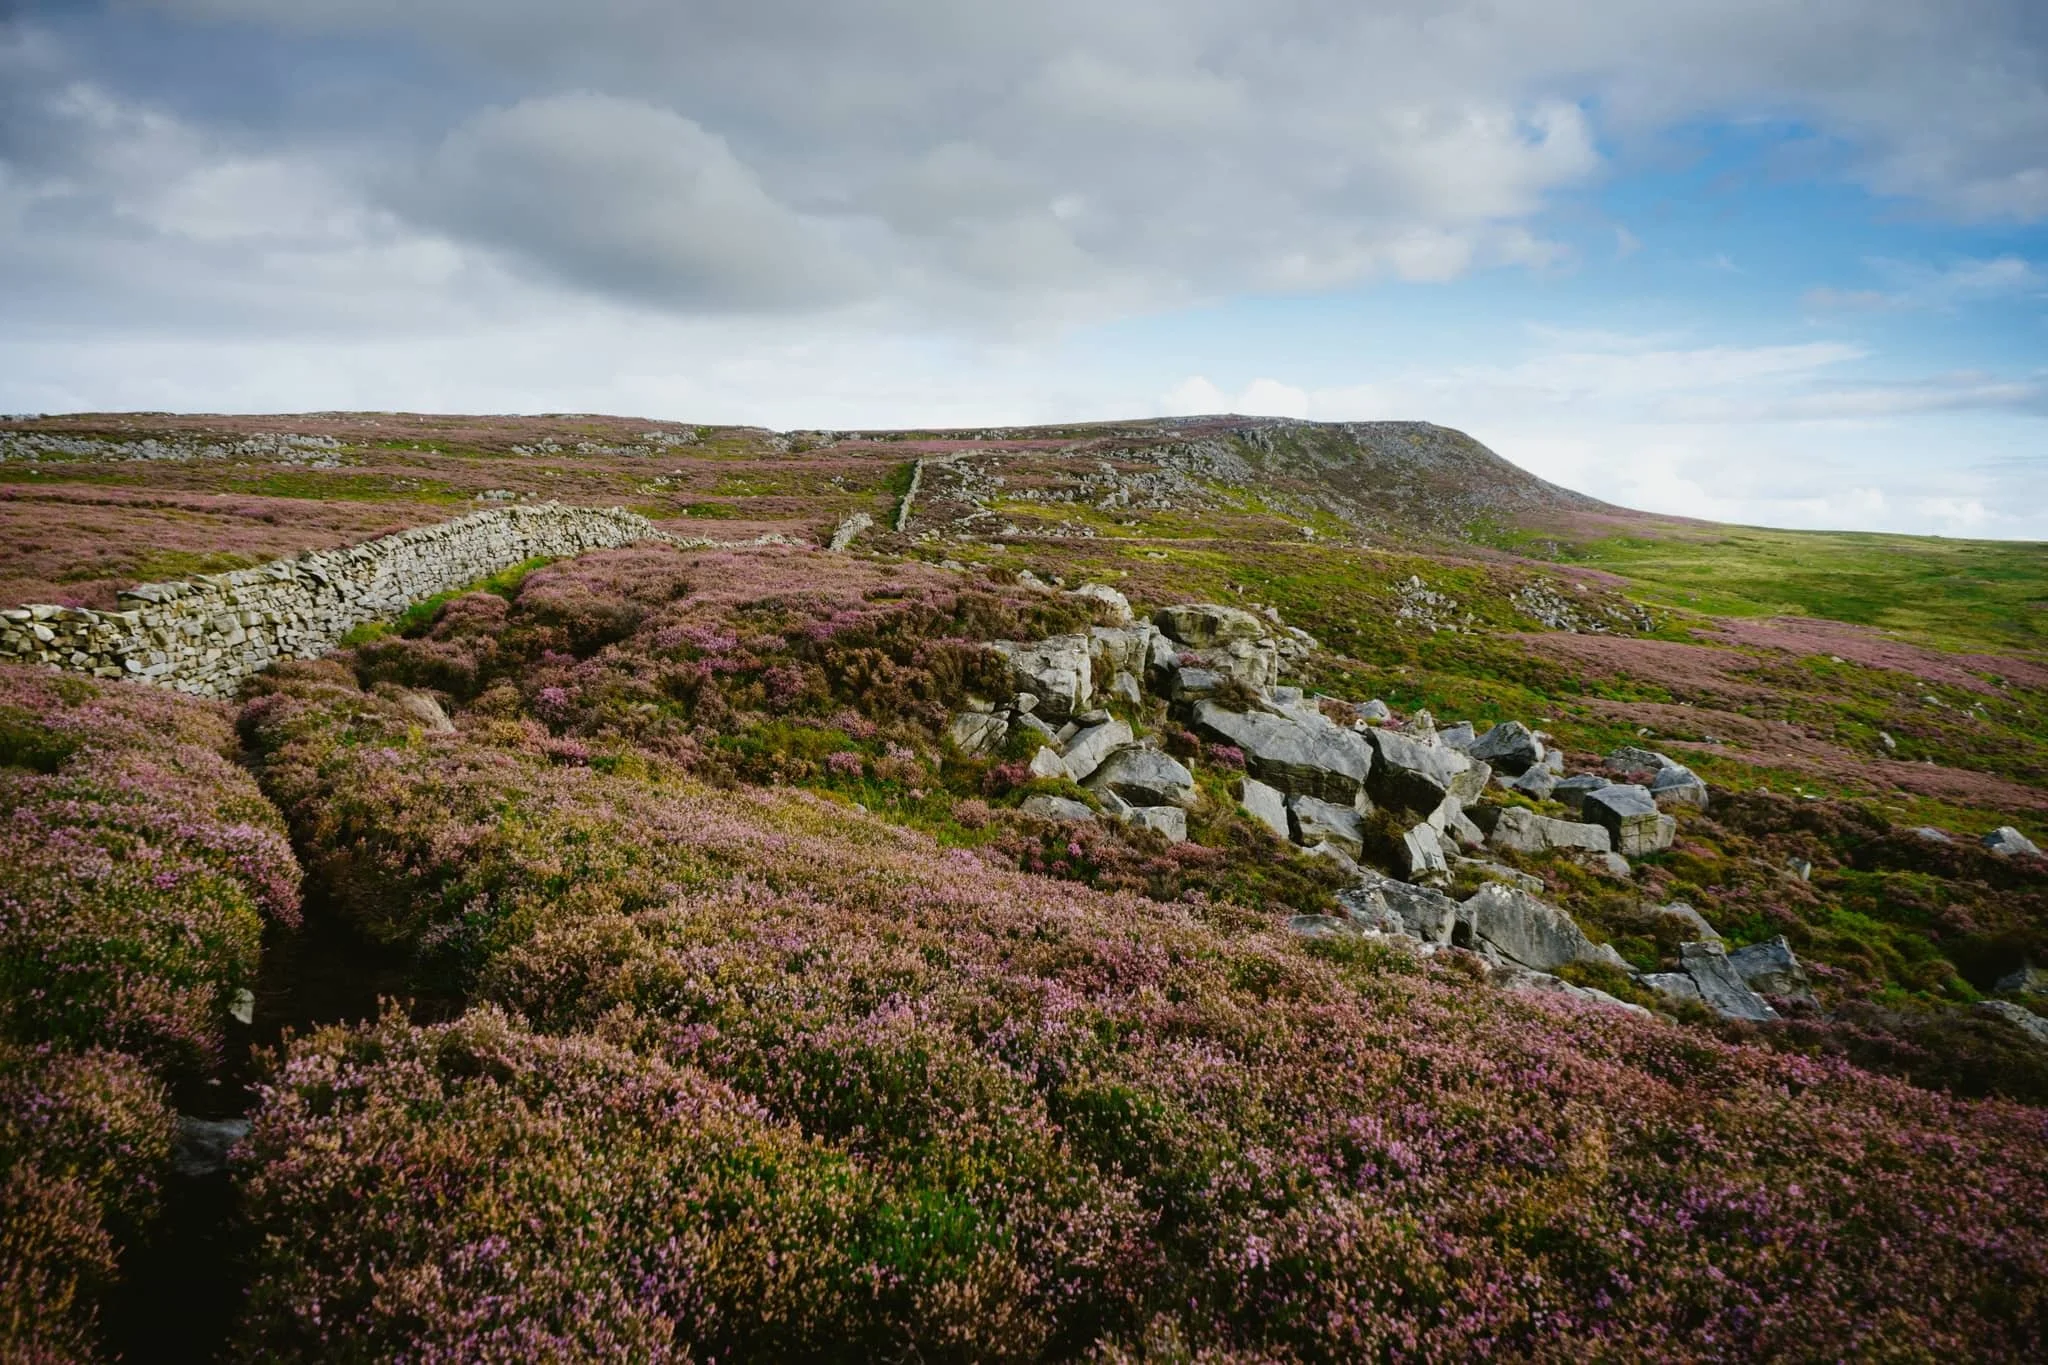
Just a few yards from the car park and already we could see the extent of all the pinky purple heather blooming in the area.
This trail is the more direct route up to Clougha Pike. But for our hike, we chose a more circular clockwise route, skirting around the old quarries and heading towards Littledale.
The colour contrast between the heather and the grasses was proving too hard to resist.

A small scene of a gristone boulder being enveloped by all the heather, fern, and other moorland vegetation.
Increasingly I delight in finding, composing, and shooting these more intimate scenes in nature.

Miles upon miles of heather moorland give way to the lower folding valleys near Quernmore.
This point marked the beginning of our ascent of the fellside above Littledale, the site of a former quarry.
After crossing the infant River Conder via a concealed viaduct now known as Ottergear Bridge, we continued ascending the fellside above Cragg Wood. In the distance, Caton Moor’s windfarm catches the emerging light.
The trail gently lowered back down the fellside, but not before I captured this delightfully bucolic English view.
Another ascent ahead of us, the time the proper one that takes us all the way up to the Clougha Fell moorland plateau. The cascades of Sweet Beck presented a lovely little composition.
A swaledale yew enjoys the view from the fellside above Sweet Beck, with Caton Moor still drenched in light.
As we start ascending the back of Clougha Fell, the greens of the grass is gradually replaced the pinks of heather and the dark tones of peat, punctuated with boulders of gritstone.
The Caton Moor windfarm still getting soaked in afternoon light. In the distance, the dark clouds press down on the southwestern fells of the Yorkshire Dales.
After tacking the tricky and occasionally boggy trail up the back of Clougha, we finally joined the gravel shooter’s track and the moorland plateau. Rather then heading straight for the summit, we looped around to check this Andy Goldsworthy sculpture.
Of course, we had to take turns clambering into the “chambers” for some photos. The nice thing is, in the 50+ mph winds, these chambers were a nice respite from being constantly wrestled by the wind.
Making our way onto Clougha Fell, I had lots of fun making compositions from all the gritstone formations dotted about everywhere, such as with these boulders and the Yorkshire Dales Three Peaks in the distance.
A gritstone platform with solitary boulders, wrapped in heather, provided a nice scene towards Caton Moor and the dark fells in the distance.
It’s not quite Joe Cornish levels of composition skill, but I’ll get there one day.
A solitary gritstone boulder perched on the moorland plateau serves as a nice subject as it catches the light beneath the stormy skies.
From the summit of Clougha Pike, a mere 413 m/1,355 ft above sea level. Nevertheless, the views are gorgeous. From the summit we can see all the way across the Lune valley, towards Morecambe Bay.
From the summit, our way back down was immediately apparent. It was going to be rocky and steep.

100 m or so below the summit of Clougha Pike, a patch of smoothed gritstone boulders interspersed with heather provide me with another tasty composition.
From below Clougha Pike’s southern face, it’s easy to see how this is such a distinct and recognisable hill from many miles away.
A blast of light from the racing stormy clouds pulls all the gorgeous textures and colours from this scene.
One last look back at Clougha Pike, with heather everywhere, but we continued the descent down into the woodland toward the car park, fighting flies all the way.
Did you enjoy these photos?

Brough Castle, Cumbria, Spring
My shoulder’s starting to feel well enough for some more energetic and long-distance hikes.
My shoulder’s starting to feel well enough for some more energetic and long distance hikes.
With the weather forecast finally looking nice for the weekend, we spent Saturday with my Dad and took him to the historic village of Brough in Cumbria. Here one can find the impressive ruins of the 11th century Brough Castle.
The castle was built on the site of an older Roman fortification, called Verterae. The fort was in use until the 5th century. After William the Conqueror’s subjugation of England in 1066, his son—William Rufus—built Brough Castle in 1092 on top of the old Roman fort after successfully invading Northern England. The site of the old fort and castle overlooks Stainmore Pass and the River Eden, an important strategic stronghold.
Over the ensuing centuries, Northern England became a battle ground between the Kings of Scotland and England. In time, Brough Castle came into the hands of Clifford family. In particular, Lady Anne Clifford completely restored the castle in the 17th century, alongside a number of other properties within her vast estate. A fire broke out in 1666, gutting the castle. It fell into decline shortly afterwards, intermittently being stripped of stone for other constructions.
Brough Castle is now managed by English Heritage, who look after the ruins. We enjoyed a wander around these historical ruins, followed by a brief jaunt further along the Pennine Bridleway. Unfortunately, after February’s storms, most of this part of the bridleway was boggy and thick with greasy mud. We bailed on this occasion and resolved to do the hike again during drier conditions.
All photos taken on my Fujifilm X-T2 using my three prime lenses: a Fujinon 23mm f/2.0, a Laowa 9mm f/2.8, and an adapted Pentax SMC 55mm f/2.0. Images developed using RNI Films’ Fortia SP film profile.
The route to Brough Castle enjoys spectacular clear views towards the Northern Pennines. No wonder this area has been used to build fortifications for so long.
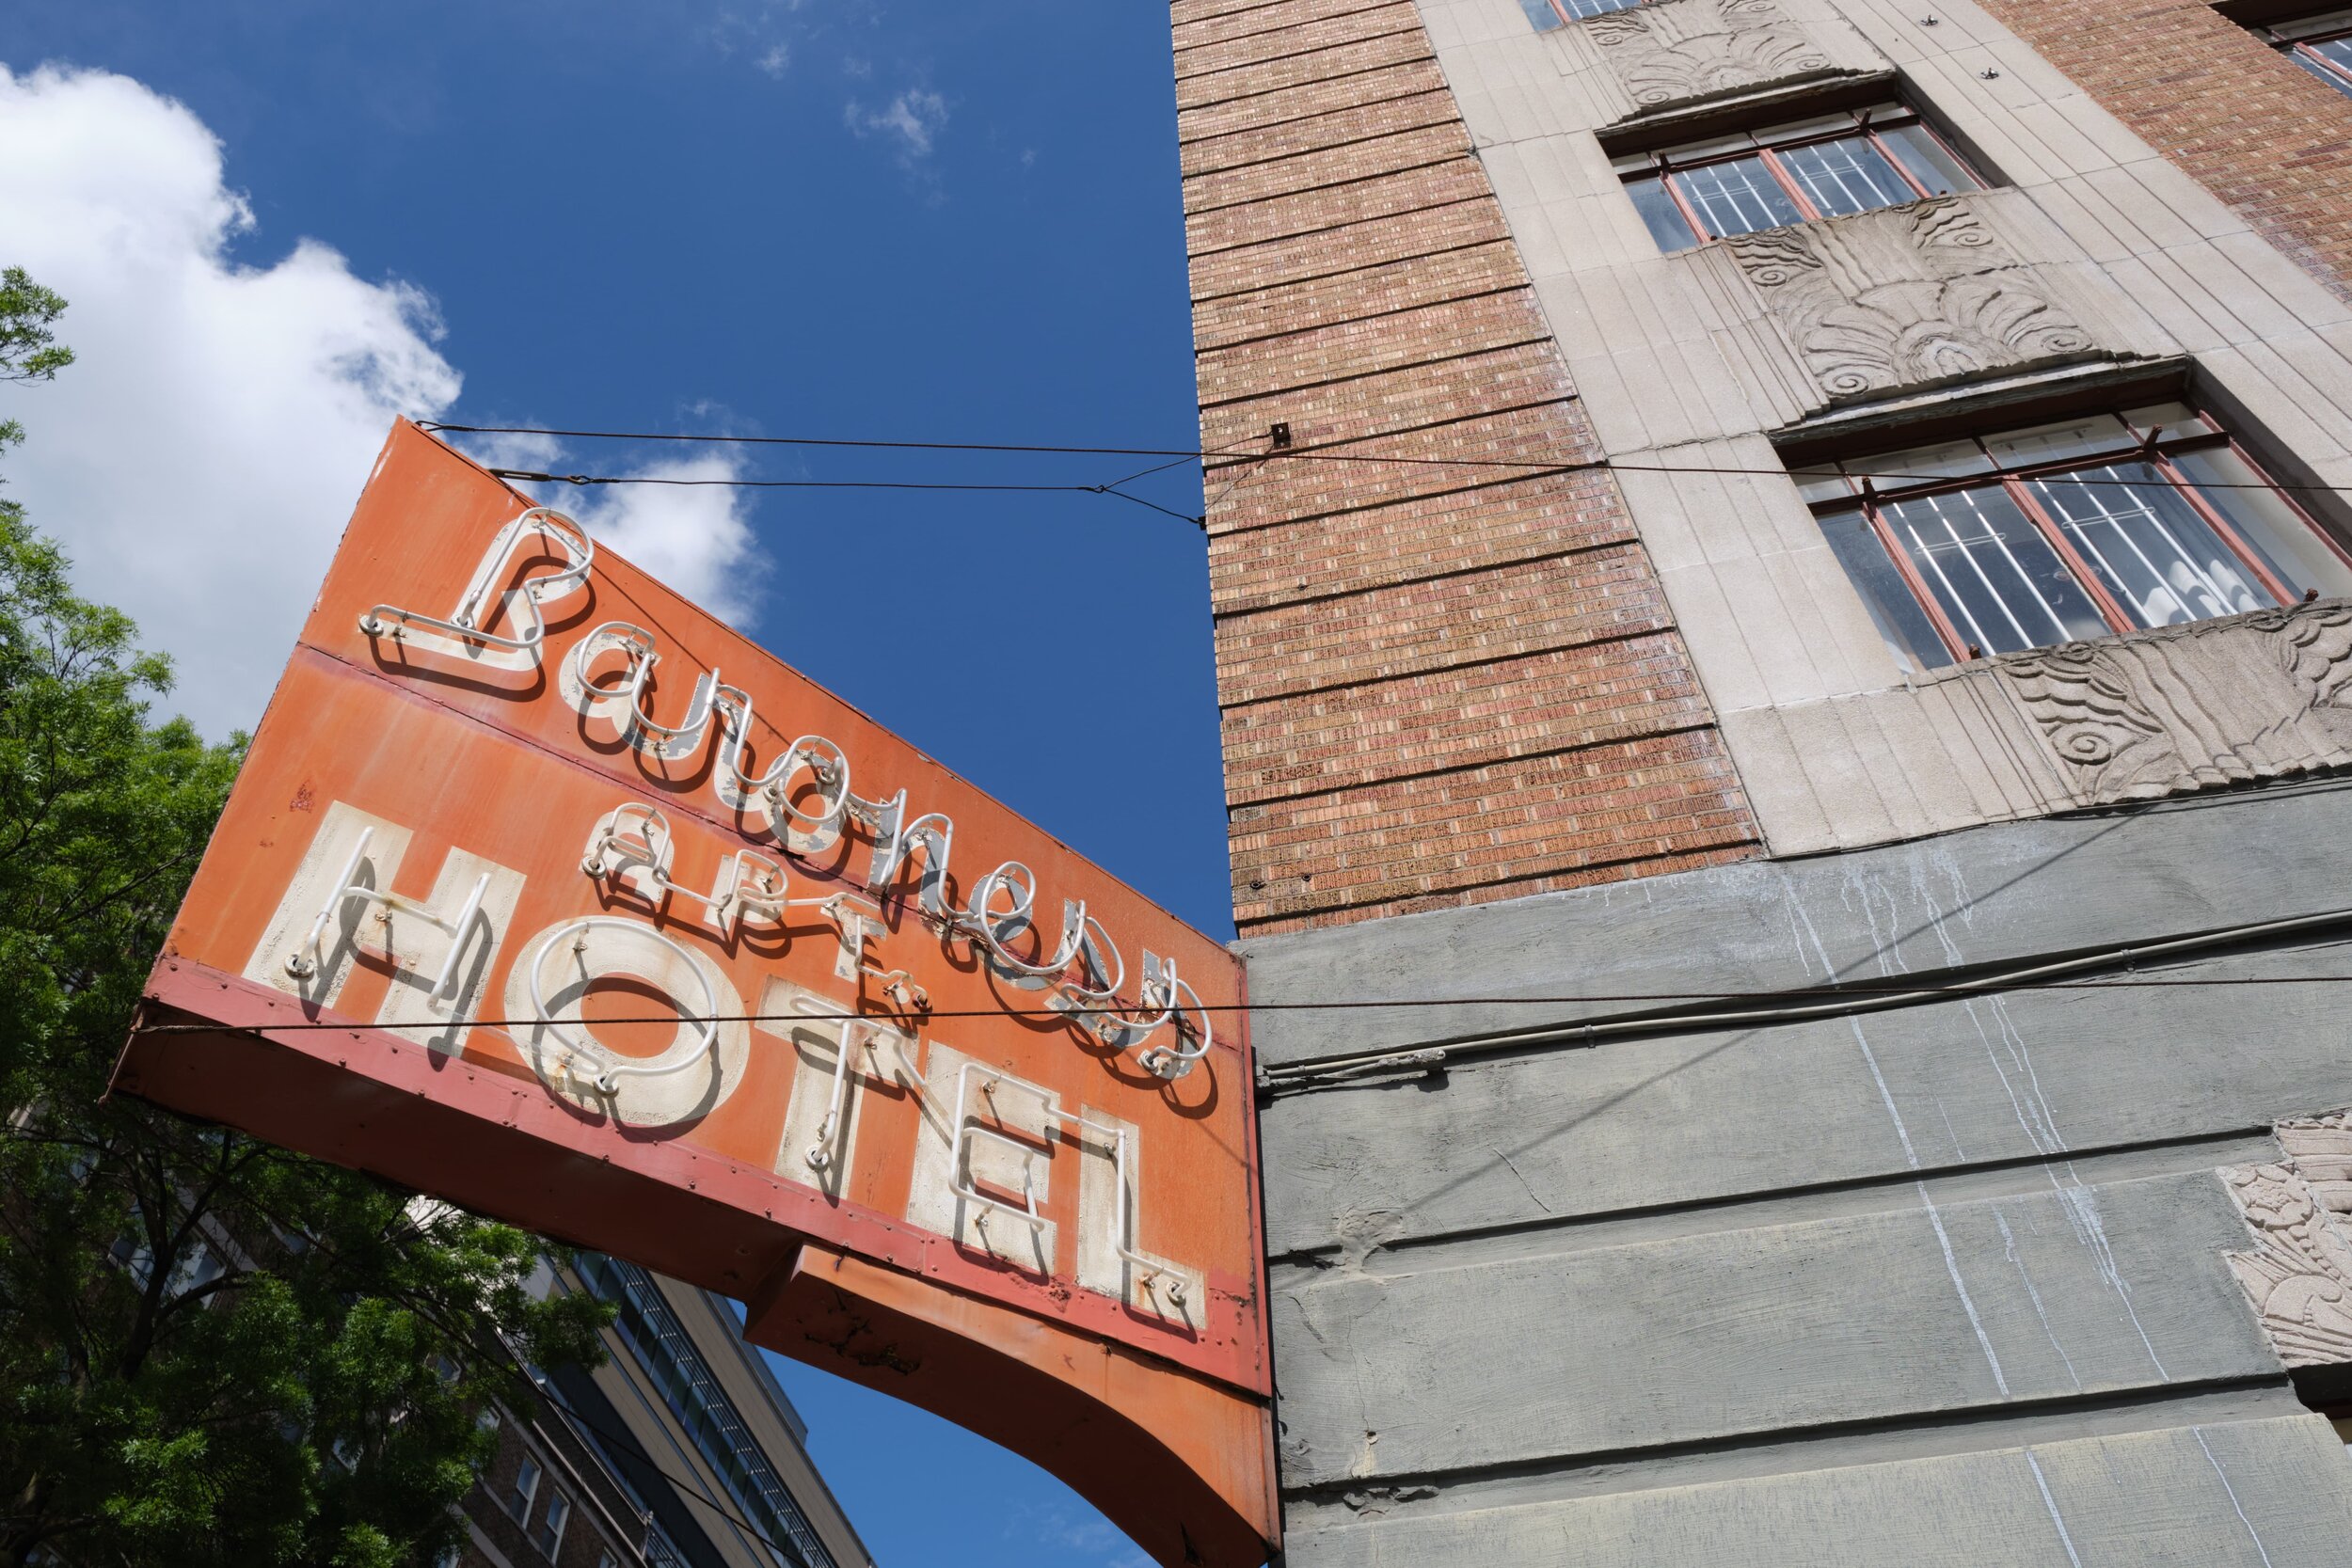
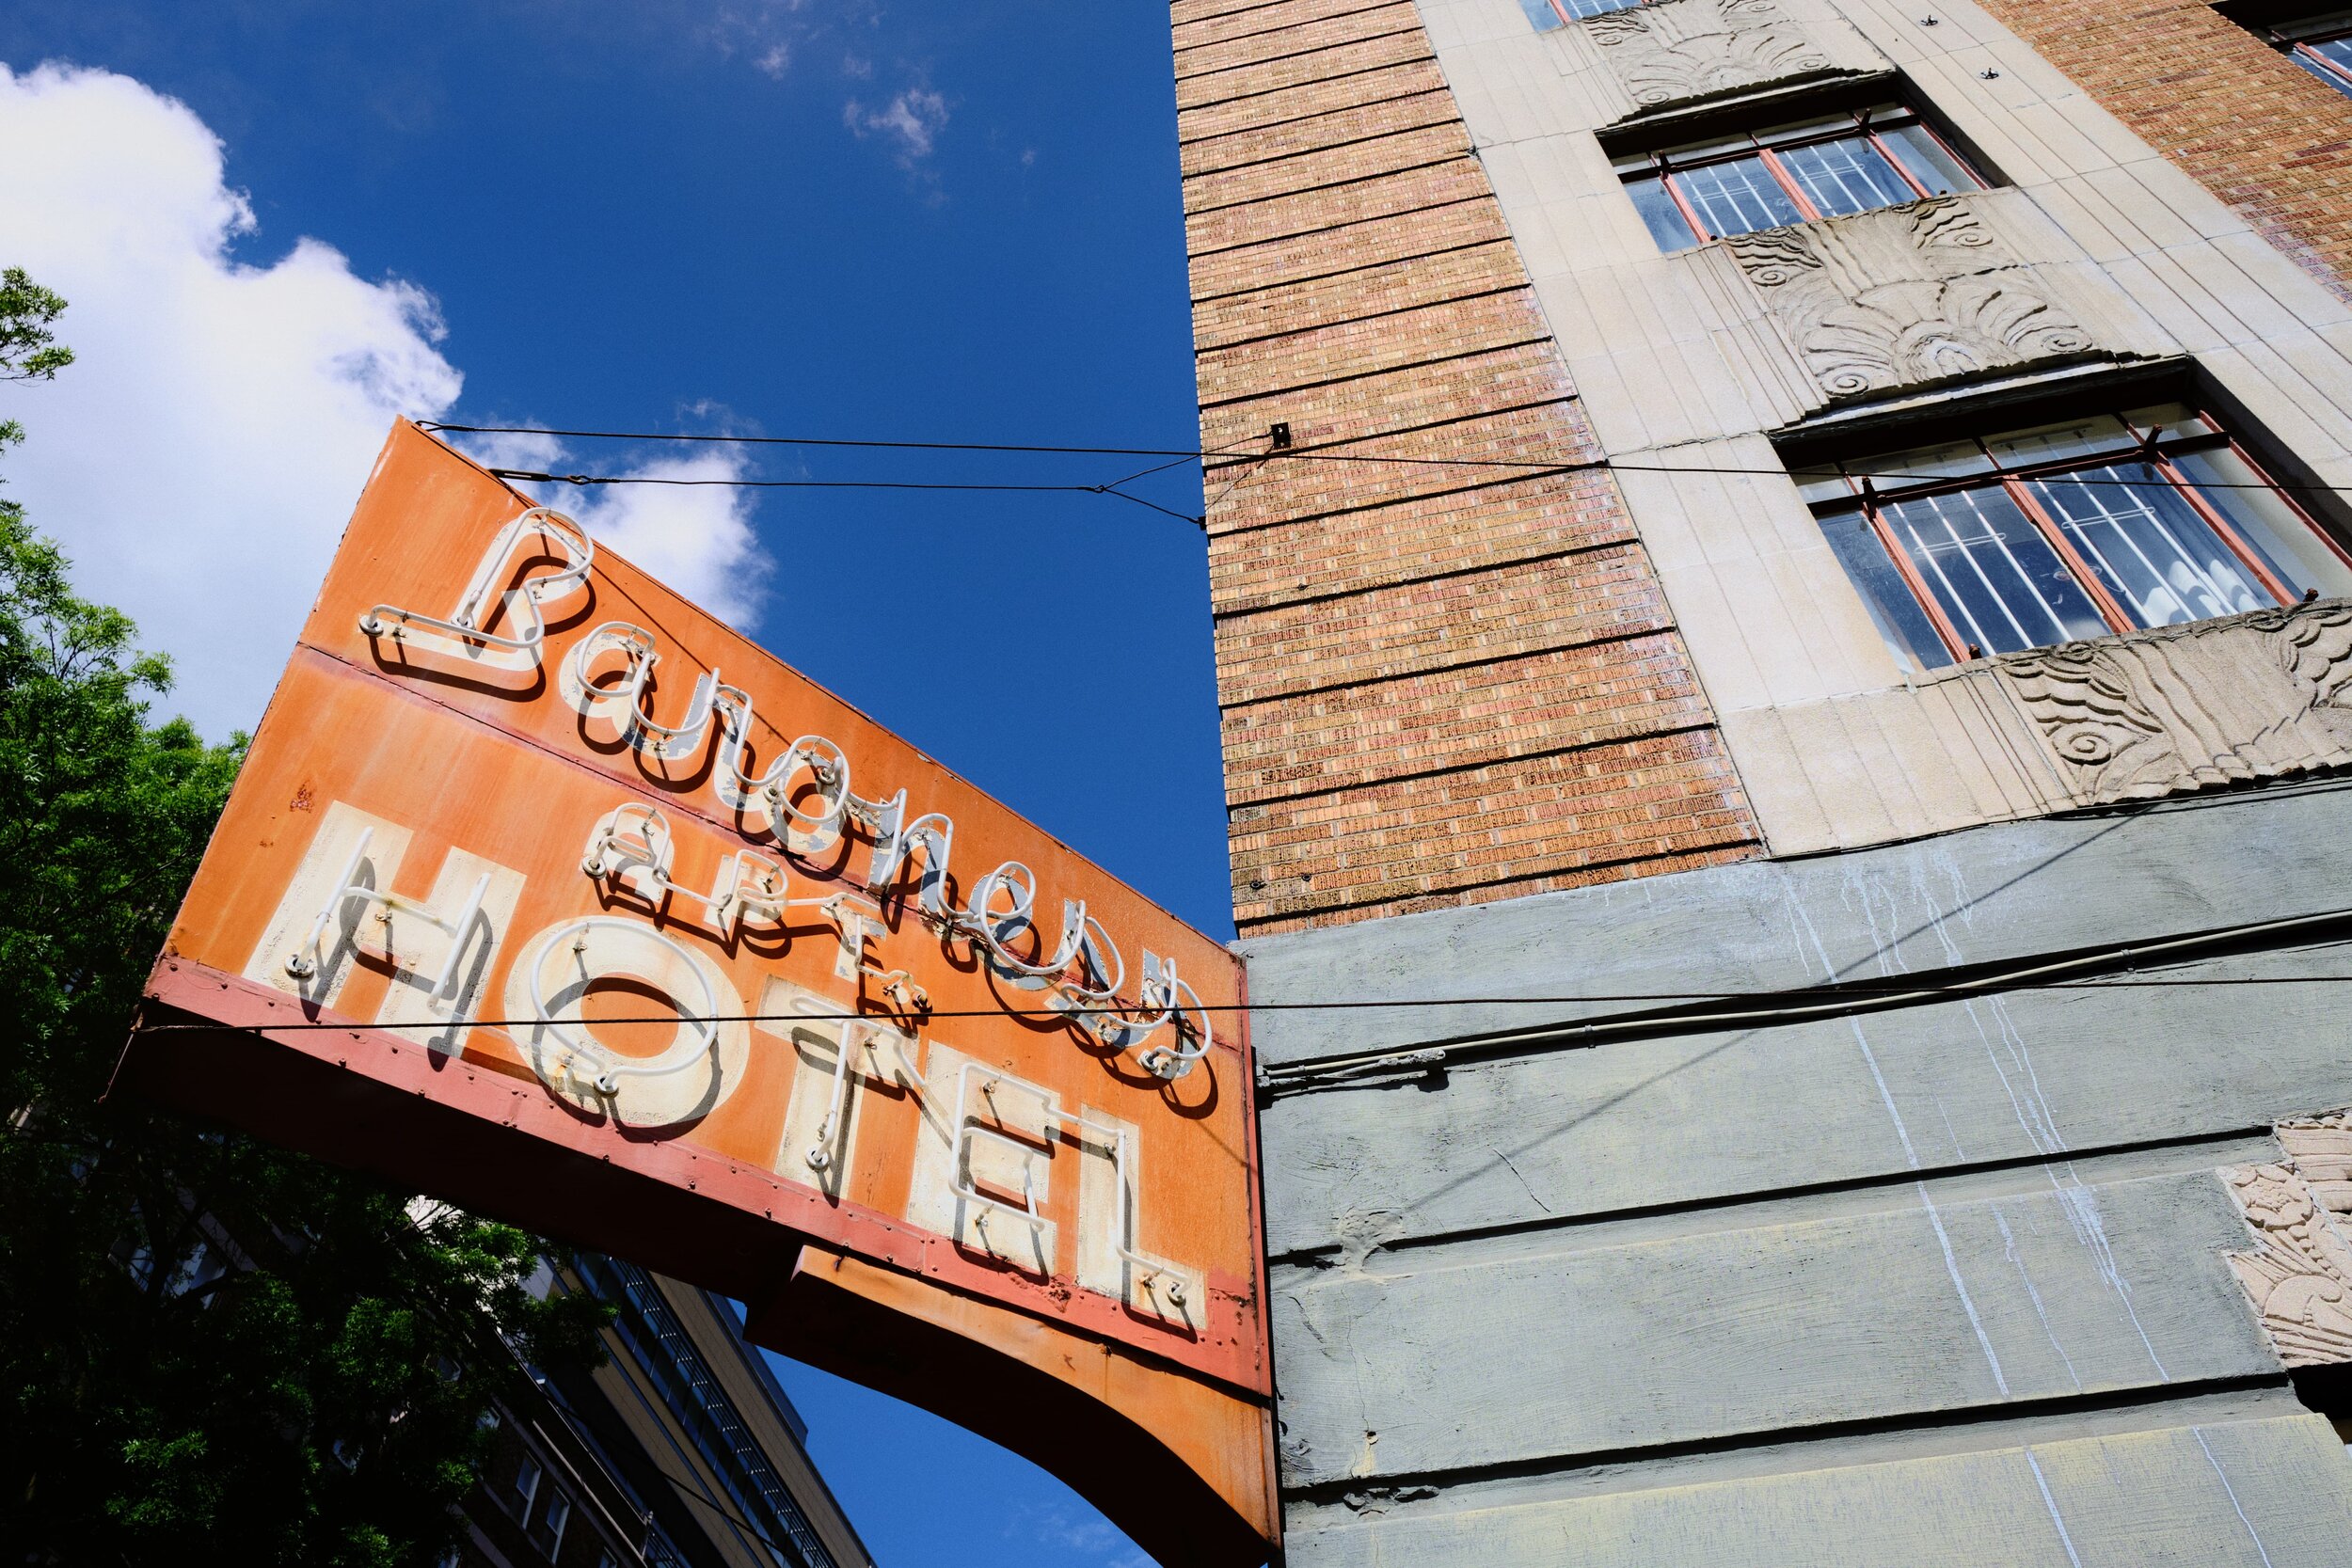
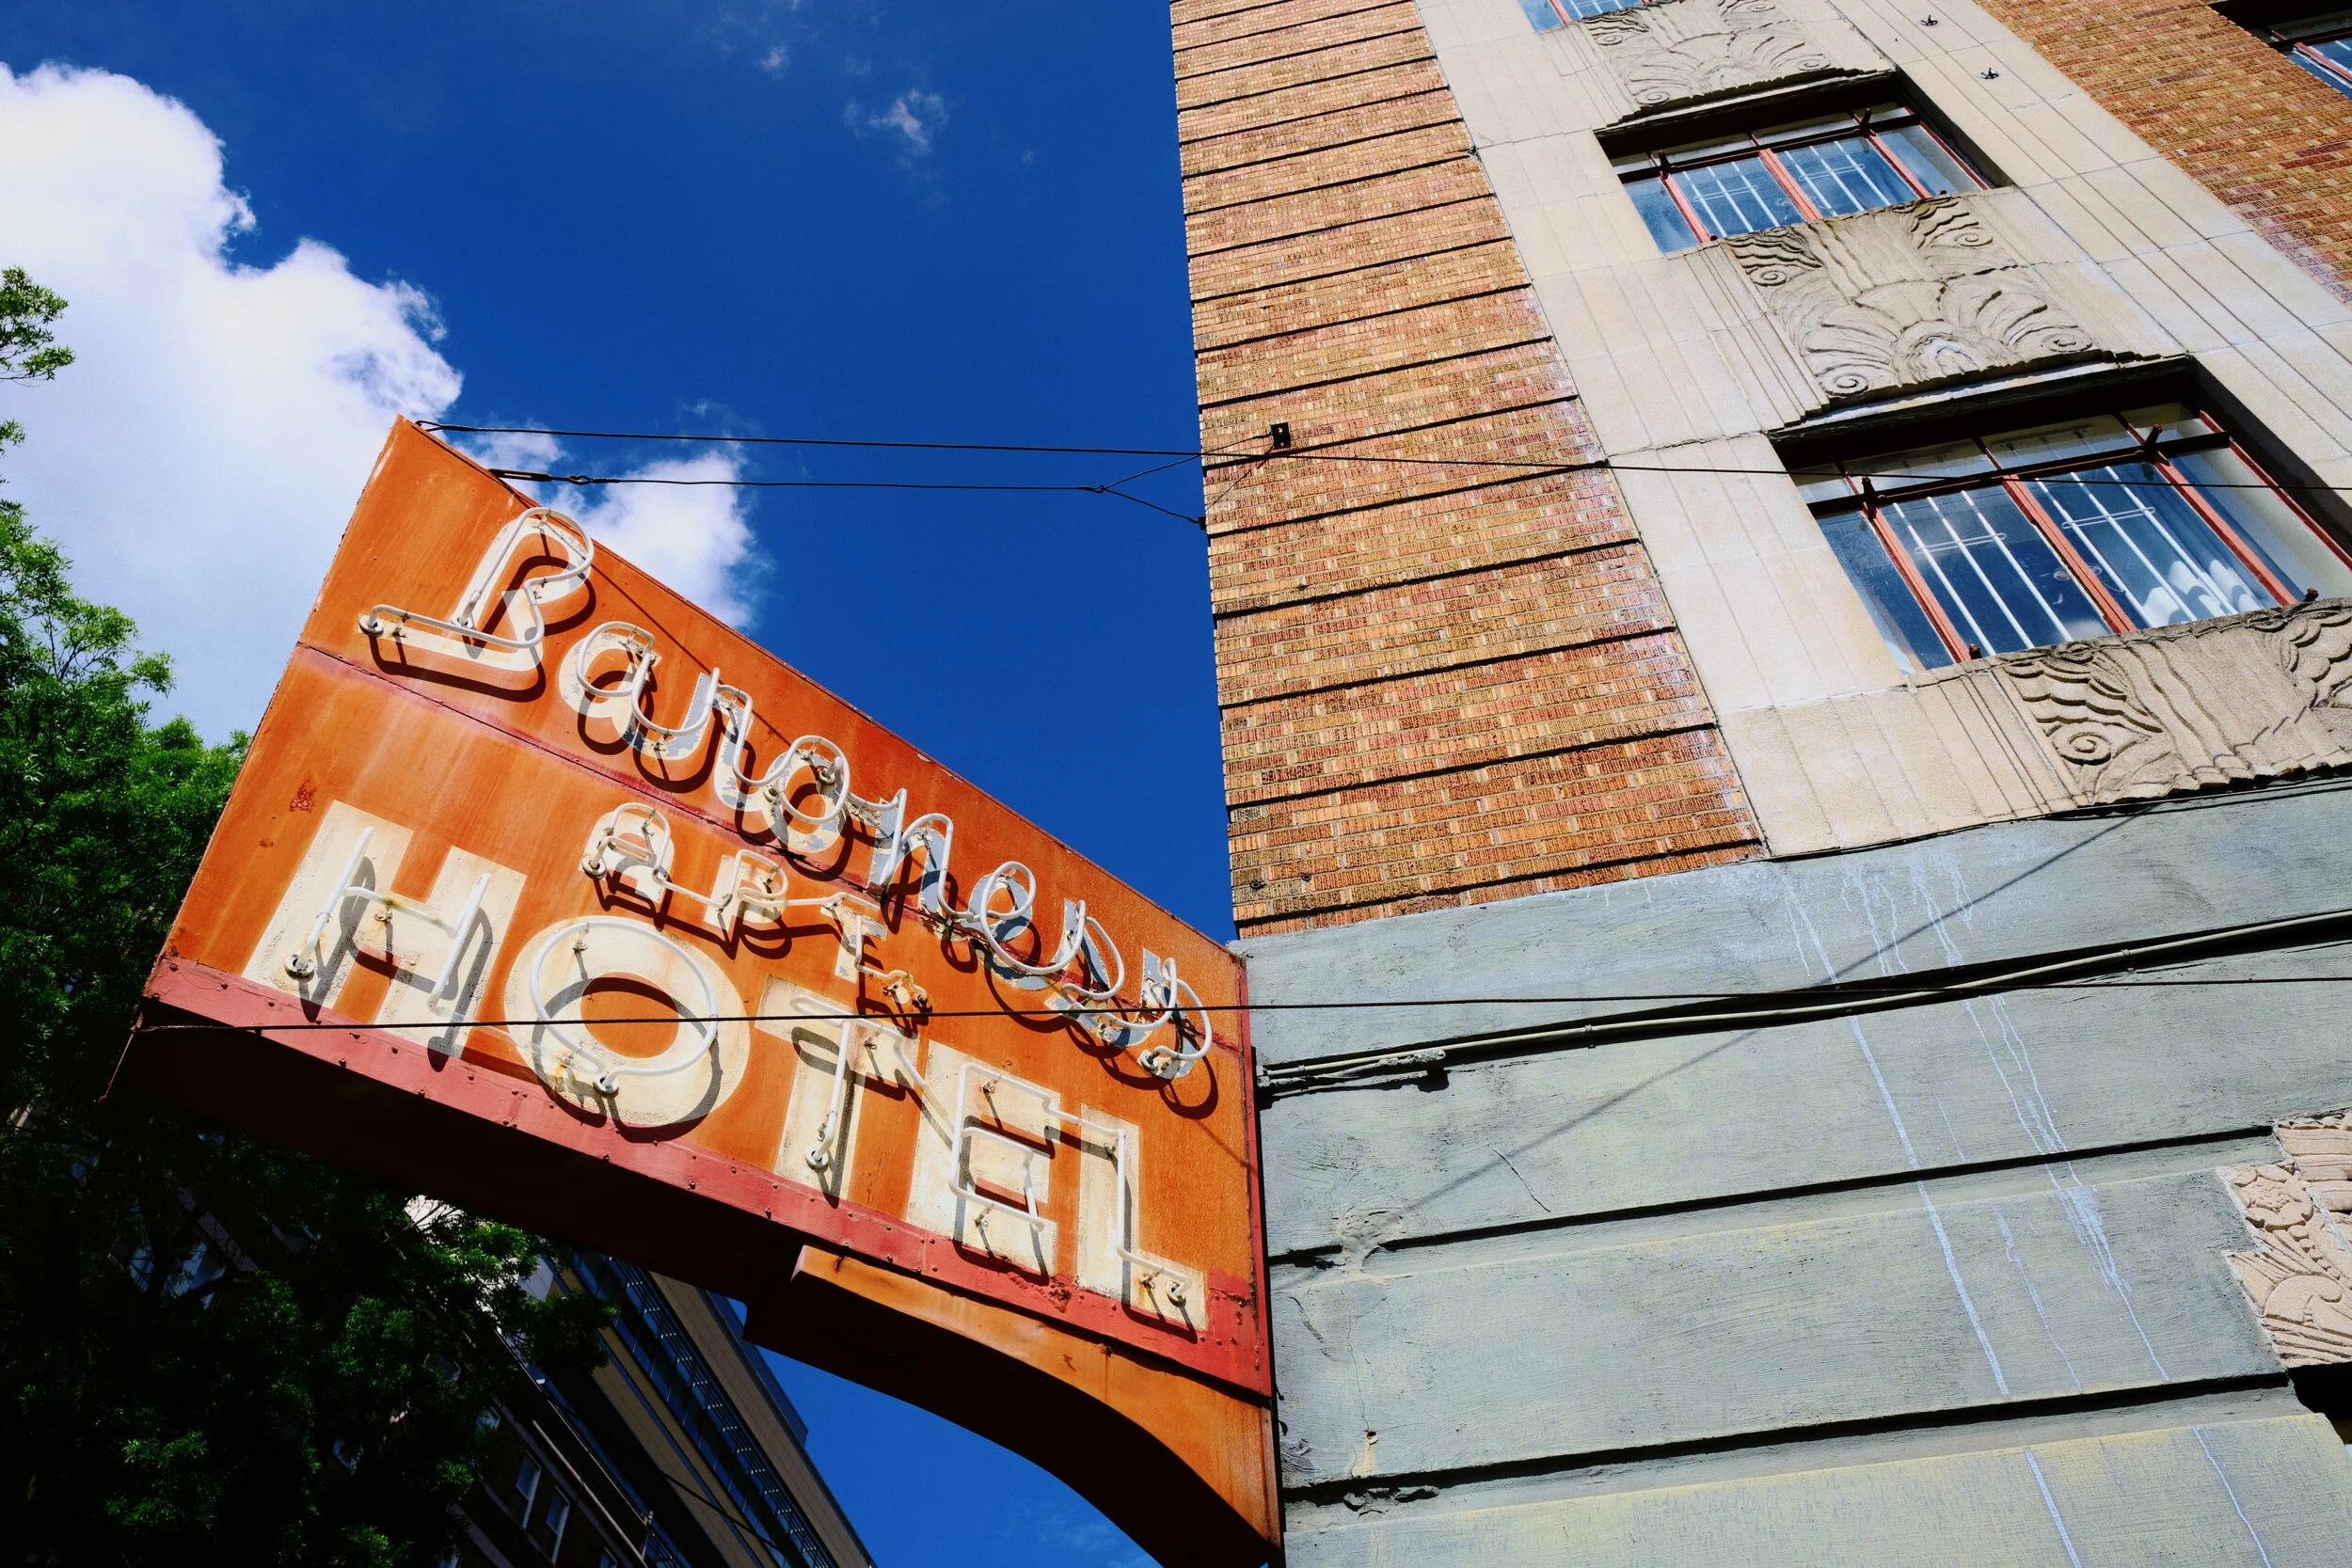
And there she is. This is the southeastern profile of the castle, showing Clifford’s Tower and its 17th-century windows.
A young family ahead of us excitedly entered the grounds.
Once in the grounds of the ruins, it was time to don my ultra-wide lens for some vast compositions of the castle.
This composition was shot underneath the 12th-century arch, with a view towards the 17th-century Keep in the distance. A mind-boggling sense of time and history.

These hall ranges were last modified in the 14th-century. To the right, high up, is the high wall of the gatehouse.
At the other end of the site, we approached the imposing Keep. It was last modified by Lady Anne Clifford in the 17th-century, and she lived in it for a period during 1665.
The Keep, originally built in the 12th-century, enjoys excellent panoramic views to the River Eden.
The Gatehouse and ranges from the Keep. I don’t know why, but this photo puts me in mind of Machu Picchu.
In the neighbouring fields, horses graze peacefully. In the distance, the flat-topped Wild Boar Fell in Mallerstang can be made out.
What magnificent structures. Their remains tell a story 1,000-years old.
I made one more ultra-wide composition of the inner and outer ranges as the light was so good.
After exiting the ruins, we located the Pennine Bridleway and followed the trail west towards the River Eden.
The views quickly open up and we are afforded lovely scenes looking back at the ruins of Brough Castle.
Looking south across the fields to the Mallerstang valley, flanked by Wild Boar Fell and Mallerstang Edge.
Though the day was sunny and clear, there was a strong and bitingly cold wind. This meant the sun made intermittent appearances, variously scanning across the land in many patterns. Upon spotting this composition, I lined everything up and simply waited for the sun to break free of the clouds again to highlight the castle ruins.
It’s easy to see why there’s been a fort of some kind here since the Ancient Roman times.
The fields will soon fill up lambs once again.
Spring is on her way.
Scout Scar, Lake District, Winter
On Saturday just gone, my Dad celebrated his 68th birthday!
On Saturday just gone, my Dad celebrated his 68th birthday!
Do you know what else happened on that day? Storm Arwen arrived. And it brought with it sustained winds of over 60mph with gusts approaching 100mph. Ultimately it caused power cuts for tens of thousands of homes across the UK as trees were torn from their roots and slammed into power lines.
In Kendal, we were one of the lucky ones. So rather than try to get to Dad’s house for his birthday, which involves driving over the A6 or M6 at altitudes several hundreds of metres above sea level, we postponed the get-together for Sunday.
This was fortuitous because as Saturday blended into Sunday, Storm Arwen left and snow arrived. By the time Dad arrived in Kendal, a fresh coating of powdery snow had packaged Cumbria in wintery goodness. What to do? Go on a walk, of course!
So we hiked up an old favourite, Scout Scar, to get some crackin’ winter views across to the Lakeland fells. And surely we did.
A smashing day all round.
All photos taken on my Fujifilm X-T2 using my Fujinon 23mm f/2.0 prime lens. Images were developed with RNI’s Fortia SP film profile, then finished off in Affinity Photo.
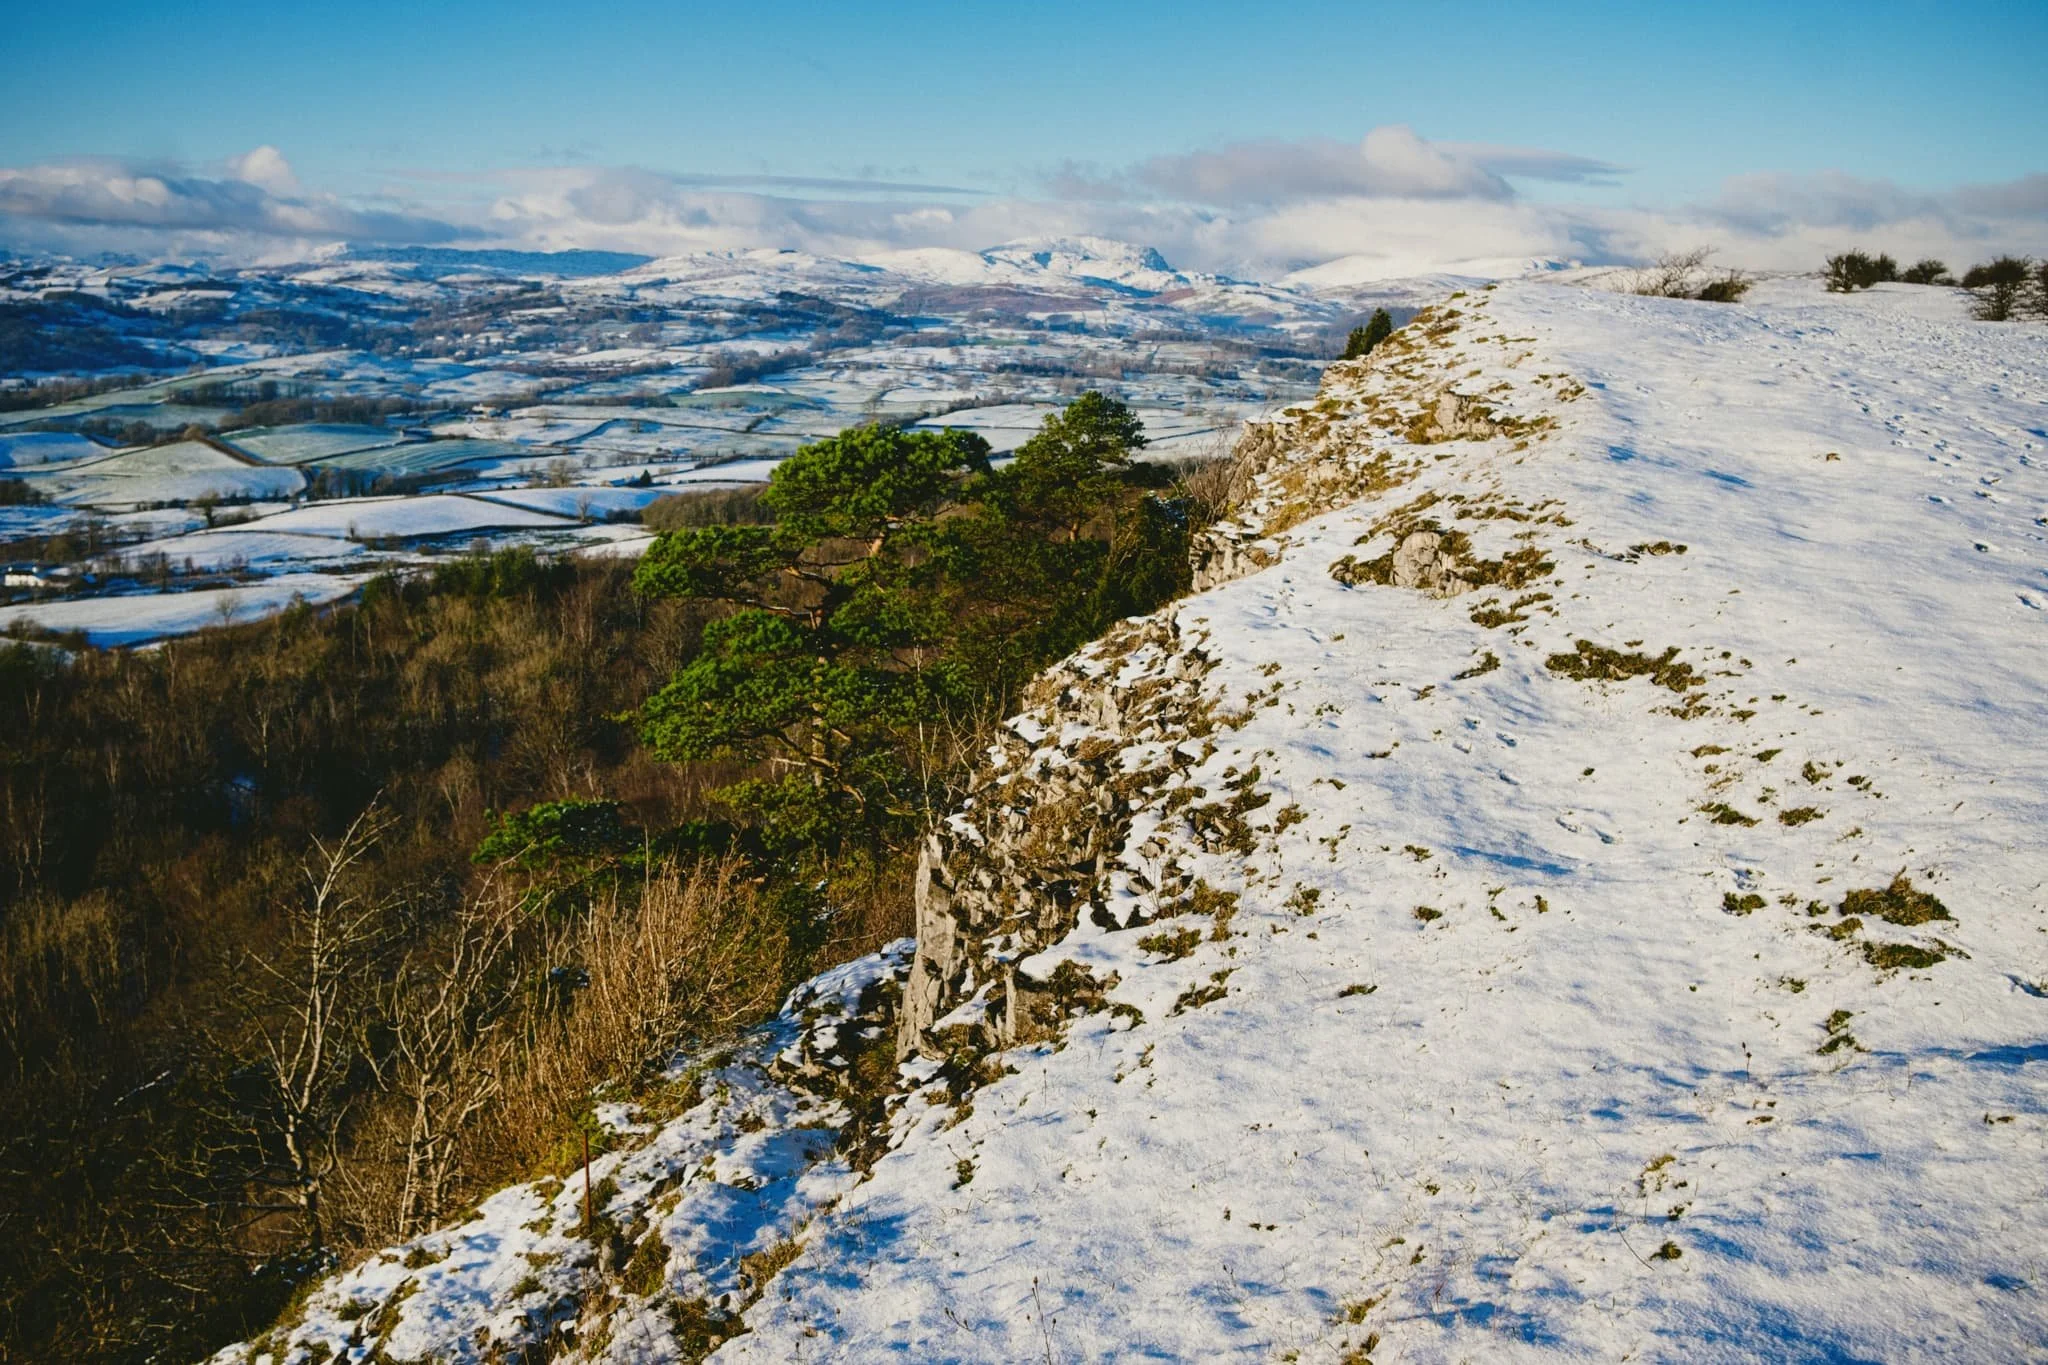
The goal initially was to drive up to, and park at, the main Scout Scar car park. We had to abandon this, though, as the entrance to it was slick with slushy ice and compacted snow. Instead, we navigated up Brigsteer Road and began the hike at the lay-bys behind Scout Scar. Already, the light was looking delicious.
My lovely Lisabet and my Dad, taking in the scenery in their own ways. Far, far in the distance are the comely shapes of the Howgills, covered in fresh snow.
It wasn’t long until we came across our first sledging family, excitedly pulling their sledge back up the fell side for another ride.
As we gain height, the views looking back across Kendal to the Howgills open up. Our excitement builds. The day is crystal clear.
And there they are, the Lakeland fells, covered in the first of 2021’s snow.
Storm Arwen made damn sure there were no autumnal leaves left on the trees. A landscape of auburn and yellow has quickly been replaced with fresh white snow.
My lovely Lisabet, glowing as she does.
The Kentmere and Longsleddale fells, in particular, were looking absolutely stunning. Mountains really do look taller with snow on them, don’t they?
I’ve been up Scout Scar so many times. I never get sick of the views from its precipice.
Something else I never get sick off: Lisabet’s hair.
Windswept trees, stripped bare of their leaves as the sun begins to set.
As we began our way back down the fell, there were still plenty of people making their way up.
Clouds laden with snow quickly started to form over Kendal.
The setting sun managed to creep underneath the gathering clouds, shooting beams of golden light across the tree tops.
A crackin’ end to a lovely day.
Various Places, Loch Lomond & the Trossachs, Autumn, Scotland
Our Loch Lomond holiday is over.
Our Loch Lomond holiday is over.
But before I say goodbye, here’s some bonus photos that didn’t really fit in with any of my other Loch Lomond Holiday posts.
I hope you enjoy them. Until next time, Scotland…
All photos taken on my Fujifilm X-T2 using my two prime lenses: a Laowa 9mm f/2.8 and an adapted Pentax SMC 55mm f/2.0 lens. Developed using RNI Films.
Kilchurn Castle & Loch Awe
Beyond the northwestern corner of the Loch Lomond & the Trossachs National Park, one can find the shores of Loch Awe and the mighty peak of Ben Cruachan (1,126 m/3,694 ft). Below the mountain lies the ruins of Kilchurn Castle, originally constructed in the 15th century as the base of the Campbells of Glenorchy. I shot this 9-image panorama using my 55mm lens to really capture the mood and setting of this scene.
Across the valley from Ben Cruachan is Beinn Eunaich (989 m/3,245 ft) with the waterfall Steallair Eùnaich rushing down its flanks. On this day, the clouds did not leave the mountain tops.
We walked to Kilchurn Castle for a closer look. As we neared the ruins, the view east briefly opened up and revealed the mountains around Ben Lui (1,130 m/3,710 ft), complete with swirling clouds.
The Falls of Falloch
North of Loch Lomond one can easily find, signposted off the main road, the Falls of Falloch and its own little car park. A brief 5-minute walk from the car park presents you with this magnificent powerful waterfall.
A 5-image vertorama on my 55mm lens reveals the full extent of the Falls of Falloch. After a week or so of low pressure systems bringing near-constant rainfall, the waterfall was positively roaring.
A fallen twig with a solitary leaf provided the perfect foreground subject for this 9mm ultra-wide composition as the falls became illuminated by the sun.
A small gap in a fence allowed access to a ledge that give me a nice open view of the falls for this composition. The pool below the waterfall is apparently known as “Rob Roy’s Bathtub”.
In 2013 a steel cage viewpoint known as the Woven Sound was constructed to enable tourists to view the falls without disturbing a lot of the surrounding area. This is the view from it.
RSPB Scotland Loch Lomond Nature Reserve
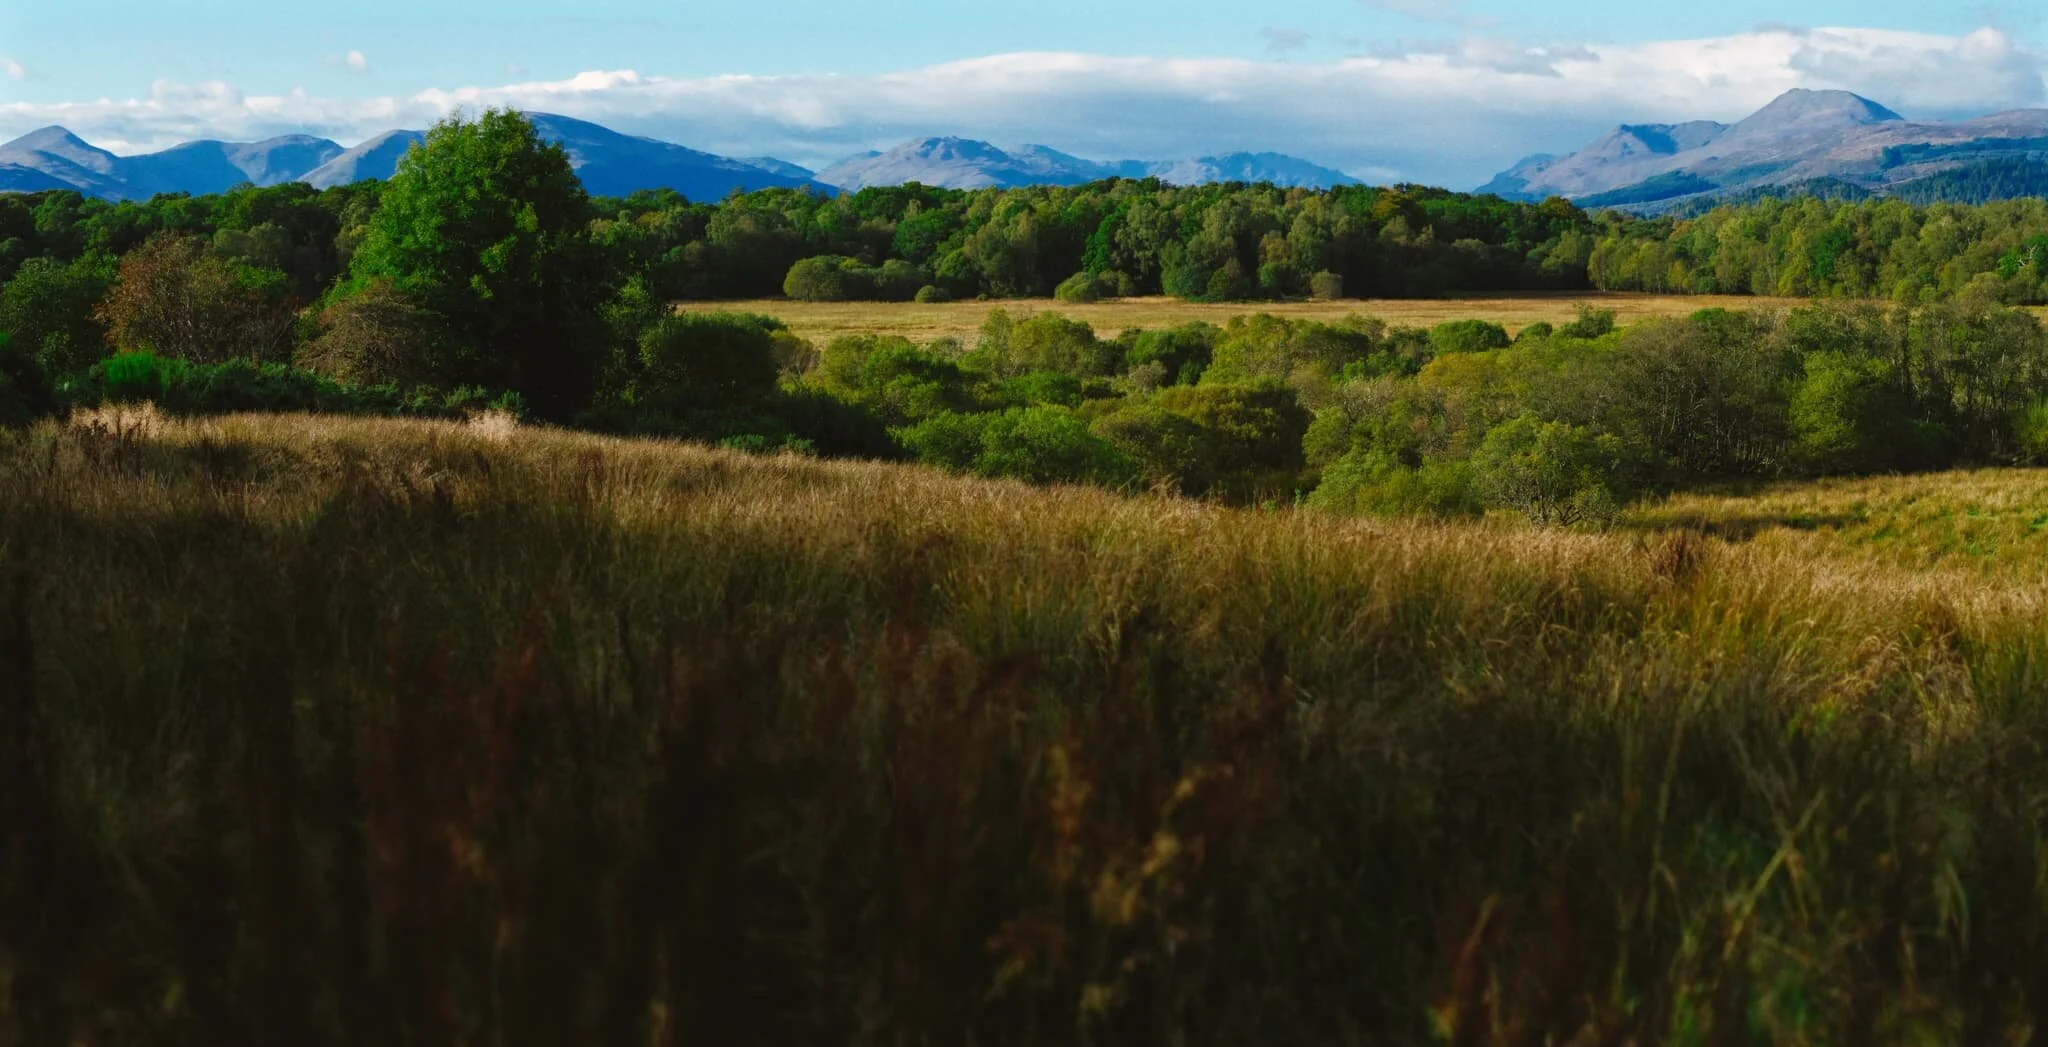
From our little cottage accommodation, a brief 5–10 minute walk took us to RSPB Scotland’s Loch Lomond Nature Reserve. As well as exploring the marshy woodland, it offers a frankly stunning viewpoint, taking in the entirety of the Loch Lomond mountains. A stitched together this panorama with my 55mm lens in an attempt to accurately capture the entire view.
A tiny little beck with criss-crossing tree trunks provides a strong foreground interest for this beautiful woodland scene in the Loch Lomond Nature Reserve.
The Falls of Leny
On our way to Balquhidder, we stopped off for a small diversion just south of Loch Lubnaig. There, one can take the barely noticeable trail that follows the main road until the roaring sound of water guides you to this incredible scene. These are the Falls of Leny. This is large panorama shot with my 55mm lens and stitched together to get this incredibly detailed and wide view of the falls.
My ultra-wide 9mm lens reveals the context of this waterfall and the gorge it’s created in the river Garbh Uisge, which is Gaelic for “rough water”. Appropriate.
Loch Katrine, Loch Lomond & the Trossachs, Scotland, Autumn
The rain finally ceased. So we set our sights on one of our “bookmarks” for this Loch Lomond holiday: Loch Katrine.
The rain finally ceased.
So we set our sights on one of our main “bookmarks” for this Loch Lomond holiday: Loch Katrine.
In particular, our true goal was a small yet isolated hill high above the loch called Ben A’an (461 m/1,512 ft). It’s a very popular hill walk and for good reason: it offers one of the grandest and most spectacular views in all of Scotland (check out the Wikipedia view here).
Unfortunately, at least for us personally, the car park and trail for the hill are being upgraded until the end of December 2021. It’s understandable; both the car park and the trail must take a battering every year.
Instead, we ventured on a loch shore walk along Loch Katrine’s northern and northeastern shore, breaking off every now and then for various compositions.
Despite the lack of ascent, the clarity of atmosphere and glorious conditions more than made up for it. Loch Katrine is 13 km long and only 1 km at its widest point, a true ribbon lake typical of a post-glacial make up. It’s ringed by various peaks all around except for the eastern shore. In particular, Ben Venue (729 m/2,392 ft) looms constantly above the loch’s southern shore, demanding your attention.
All photos taken on my Fujifilm X-T2 using my two prime lenses: an adapted Pentax 55mm f/2.0 and a Laowa 9mm f/2.8 lens. Developed using RNI Films’ Fortia SP film profile.
The booking office, should you wish to go on a delightful cruise down Loch Katrine.
Folk getting ready for a lovely boat ride on the loch. The coats and hoods are to protect against the cold; the day turned out to be gloriously sunny.
Y’know what’s better than a boat? A boat with bunting.
Autumn colours around Loch Katrine are looking proper lush.
Once you move beyond the Trossachs Pier area, the loch opens up and Ben Venue immediately draws your attention. I shot this photo as a vertorama, five separate images top to bottom.
Towards Loch Katrine’s eastern shore reside many small islands. They are noteworthy as being able to look back in time for an idea of what a fully forested valley this would’ve been.
We managed to drop down to the loch shore near Silver Strand for some compositions across the loch. I used my 9mm ultra-wide lens to get this composition looking towards Ben Venue.
Across the loch from Silver Stand is Eilean Molach, or Ellen’s Isle.
Autumn fern popping up amongst the lush forest colours, my Lisabet striding purposefully ahead.
One of many beautiful little cascades that flow into Loch Katrine from the many hills that surround it.
We eventually reached a spit of land—variously known as either Brenachoile Point or Ruinn Dubh Aird—that protrudes out into the loch, affording us fantastic views all the way up and down Loch Katrine. Looking east, the unmistakeable profile of Ben A’an comes into view and I shot this photo; a mental bookmark to return to this area again and summit that hill.
We clambered down to the eastern shore of this spit of land, and I was of course delighted to find various boulders strewn around. On went my ultra-wide lens, and I began making compositions.
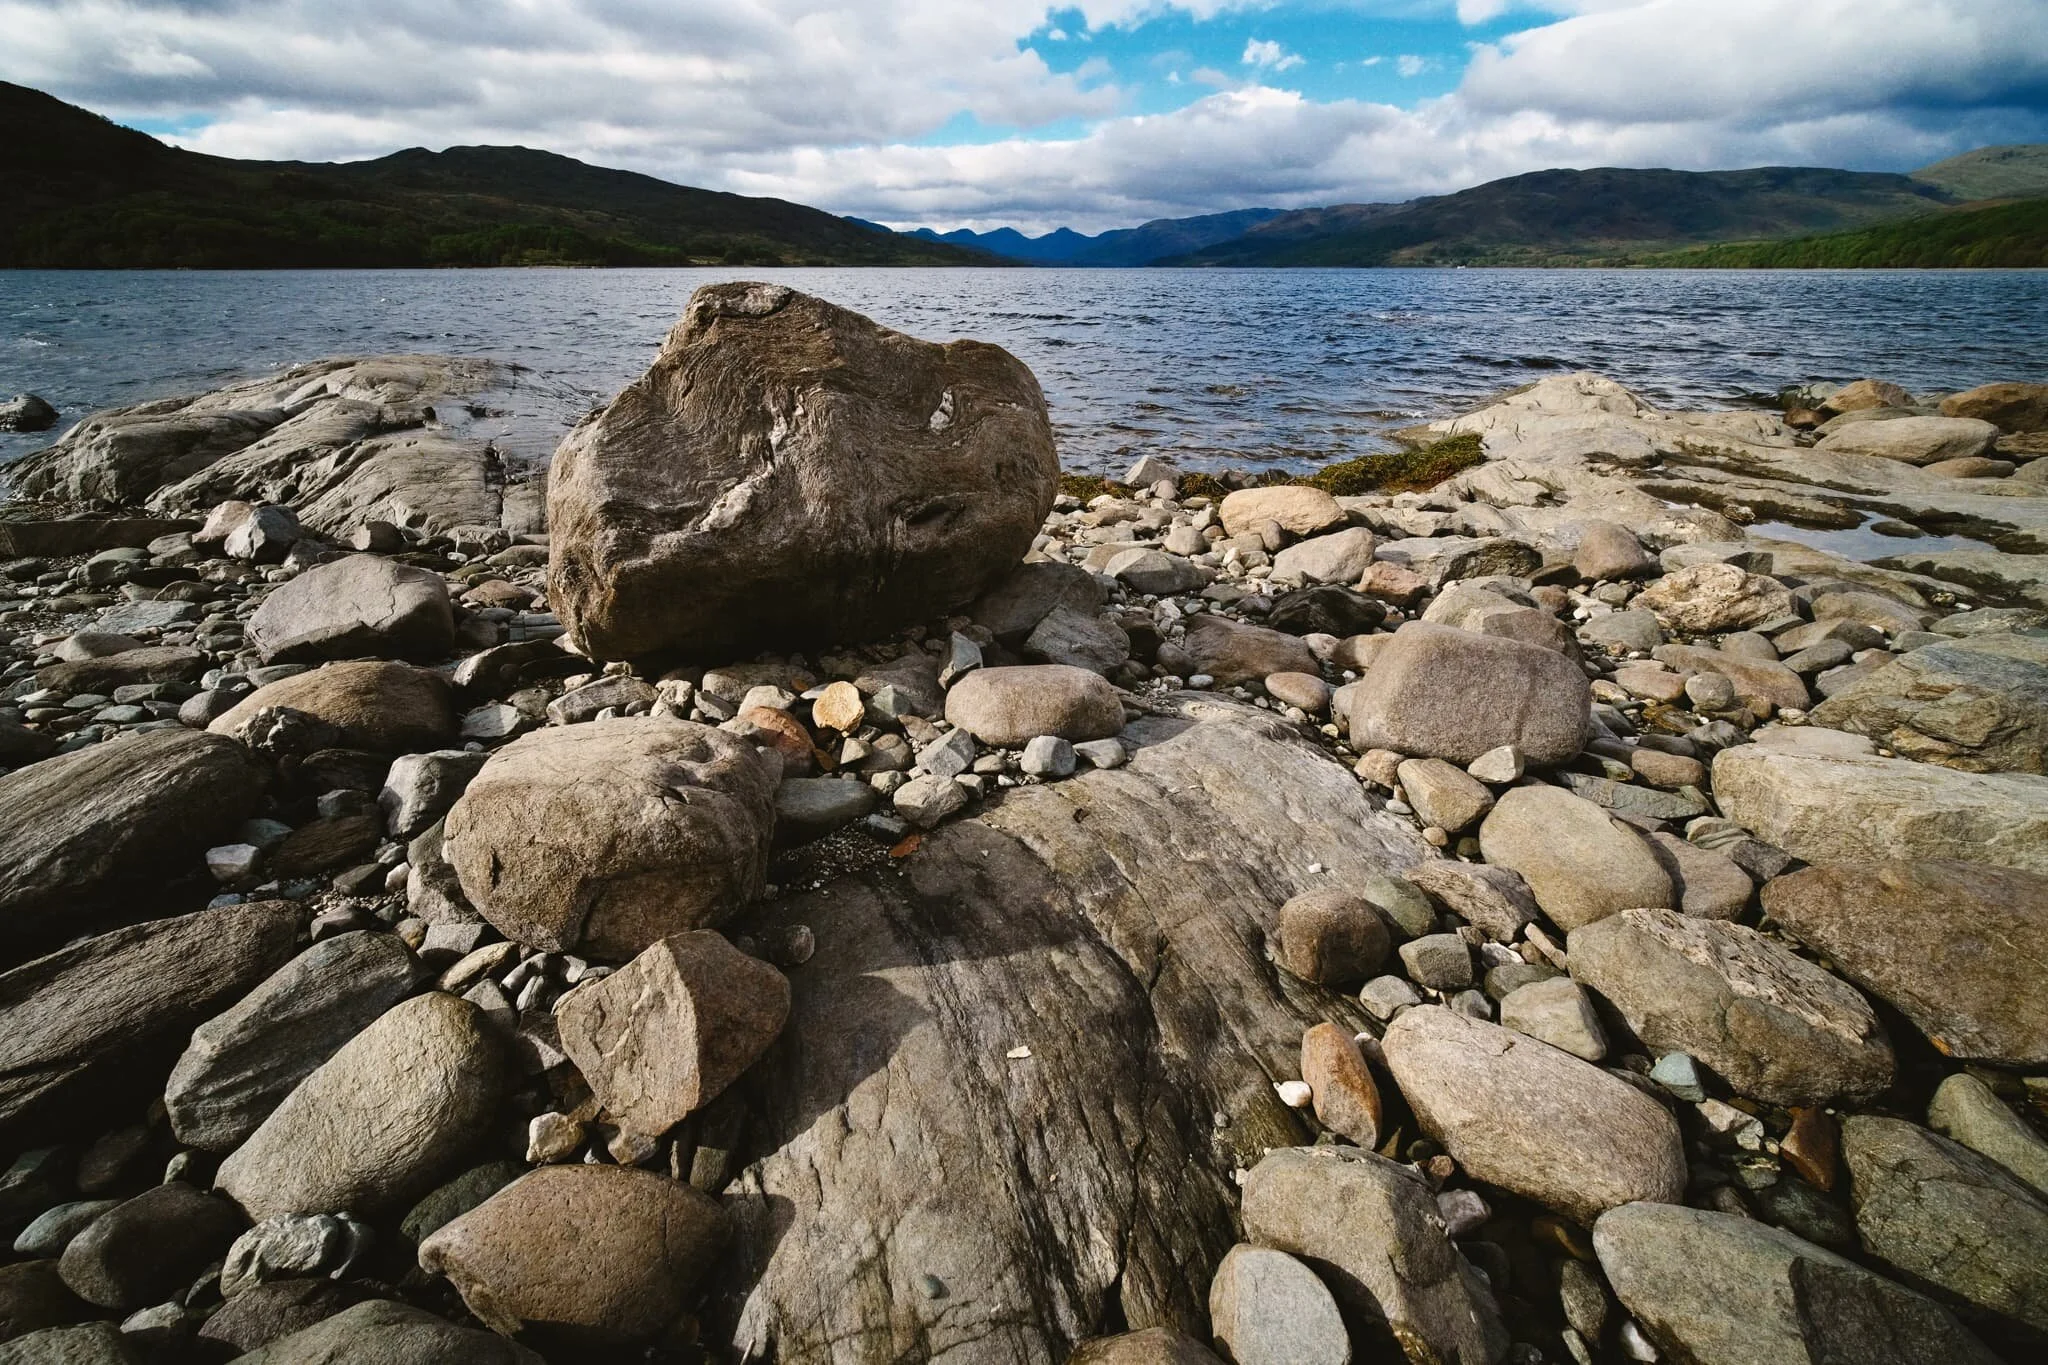
In addition, the loch’s water level still hasn’t quite recovered from this year’s remarkably dry summer. As a result, various wave-sculpted rock formations are still visible above the water.
Another sculpted boulder provides an interest foreground subject as contrast against the dark mountains in the distance,
Above the spit’s eastern shore, the last of the year’s heather bloom and a fantastic rock formation give another chance at a different composition.
The boulder in question.
Back onto the loch shore road, I keep my 9mm ultra-wide lens on to nab some compositions looking deep into the forest that looms above the loch.
Beautiful autumnal fern and the looming forest of pines above.
A wonderfully craggy tree that almost seems to grow from the boulder itself.

Further along the loch road, silver birch make an appearance as stark paint brush strokes amongst the autumn palette.
After returning to Trossachs Pier, we moved the car a short distance to the Ben Venue car park. We weren’t about to tackle Ben Venue itself; despite being “only” 700 m high or so, it’s notoriously steep. Instead, a considerably smaller crag—Creag Noran, only a 10-minute walk or so—promised lovely views to Ben A’an, Ben Venue, and across to Loch Achray. It did not disappoint. This is Ben A’an’s southern profile from Creag Noran.
Well, this is glorious. A nine-image panorama of Loch Achray from the top of Creag Noran. Bloody lovely.
My lovely Lisabet, amongst the heather and trees on the summit of Creag Noran.
Looking southwest from the summit of Creag Noran to Ben Venue. Lisabet has the perfect hair for this kind of photo.

Fujifilm Color Chrome Effect: How To Recreate In Affinity Photo
This is how to create Fujifilm’s “Color Chrome” effect in Affinity Photo.
Back in 2017, camera nerds (myself included) were very excited by the arrival of Fujifilm's first digital medium format mirrorless camera: the Fujifilm GFX 50S.
It featured a sensor 1.7x larger than your usual full-frame 35mm digital camera sensor, in a small body, and promised incredible resolution and that oft-desired "medium format look". And all for considerably less money than the, at the time, current crop of digital medium format cameras.
The GFX 50S included Fujifilm's "film simulations", much like Fujifilm's previous APS-C sensor X-series cameras, but added an extra feature for this medium-format beast: the Color Chrome effect.
The inspiration behind the Color Chrome effect
According to the Fujifilm-X website:
The inspiration for this look comes from FUJICHROME Fortia, a color reversal film that was only available in Japan between 2005 and 2007. Fortia famously promised "more contrast and color than Velvia". The ultra-saturated look that Fortia delivered attracted a cult following, but because it was only made in limited quantities, not many photographers had the chance to try it - until now!
To give you an idea of what colours you could achieve on Fujichrome Fortia film, I've included some slides below:
Photo: biel* "hello, colors of summer!" by * tathei *
Photo: F1000034 by Vega Tenor
Photo: Untitled by akino ringo
As you can see, the colours on Fujichrome Fortia SP are rich, vibrant, and deep... but I wouldn't say "out of control". They're not Agfa Ultra 50 colours.
To my eye, and of course you're free to disagree, I find these colours just wonderful to look at.
Fujifilm sought to bring back those rich and deep tones of Fortia SP for their new Fujifilm GFX50s medium format camera. The result is called the Color Chrome effect, available in-camera in two strengths: Weak or Strong.
Quoting from Fujifilm-X again:
Usually, when photographing colors such as red, orange, or green under high-contrast conditions, it's easy for an RGB color channel to become overloaded - as if individually too bright. Under these conditions, with contrast and brightness at a maximum, there is no room for a full range of tones and the scene tends to look a bit flat. But with Color Chrome switched on, subtle differences of tone can be detected and enhanced. The result is a punchy, high saturation image that doesn't lose its impact and depth.
This in-camera setting was later ported over to several of Fujifilm's X-series of APS-C mirrorless cameras, such as the X-T3 and the T-30.
Older X-series cameras, such as my beloved X-T2, may never gain this setting.
But, I think I figured out to replicate this in Affinity Photo (you can translate this guide to Photoshop, if you want).
Here's how.
The Fujifilm Color Chrome effect tutorial
The image we're starting with I downloaded from DPReview's X-T4 sample gallery.
Photo by Richard Butler for DPReview. Processed in Capture One, no noise reduction and no sharpening using the Provia (Standard) film simulation.
After some personal edits of the RAW file (change from Provia to Velvia, slight vignetting and minor contrast curve), this is the edit that I'll be applying the Color Chrome effect on.
Step 1: Load your edit in Affinity Photo.
Step 2: we're gunna first apply a small degree of colour boosting using Affinity Photo's curves adjustment. So add a Curves Adjustment layer.
Step 3: switch the colour mode of the Curves Adjustment from RGB to LAB.
Step 4: Switch the channel you want to edit from "Master" to "AOpponent".
Step 5: drag the bottom-left point of the Curve to the first line, then drag the top-right point to the third line. This creates a very extreme "s-curve". Working in the LAB colour mode allows us to modify only the Chroma (colours) of the image without altering its Luma (lightness). The colours affected in the "AOpponent" channel are Red and Green.
Step 6: switch to the "BOpponent" channel and repeat the same curve. This will affect the Blue and Yellow colours in the LAB colour mode.
The colour boost will be very strong, so feel free to reduce the opacity on this Curves Adjustment layer.
Step 7: we need to create a mask that will allow us to target only the colours that are strongly saturated i.e. a Saturation Mask. You can make one using a Selective Colour Adjustment layer.
Step 8: first, make sure you uncheck the "Relative" checkbox in the Selective Colour Adjustment window.
Step 9: for each colour in the Colour dropdown list, you'll want to move the "Black" slider all the way to the left. In this instance, we're already in the "Reds" colour, so slide the "Black" slider all the way left, to -100%. Then do some with Yellows, Greens, Cyans, Blues, and Magentas.
Step 10: for the next three "colours" in the Selective Colour Adjustment window ("Whites", "Neutrals", and "Blacks") you'll want to do the opposite and slide the Black slider all the way to the right, at 100%.
You'll end up with a weird grayscale image.
This is your Saturation Mask. It's a grayscale interpretation of where your most saturated colours are in the image. The closer to white the mask is, the more saturated a colour is. The closer to black the mask is, the more desaturated a colour is. In the image shown, the sign (which we know is red/orange) is very bright in this mask, indicating that the colours here are very saturated. Conversely, the grey wall towards the bottom-right of the image are represented as nearly black in this mask, telling us that the colours here are very desaturated.
Let's convert and save this into a mask.
Step 11: create a new "stamped" pixel layer of the Saturation Mask. Go to "Layer" in the menu, then "Merge Visible".
This will create a new pixel layer on top of your layer stack, filled with the Saturation Mask.
Step 12: right-click on the thumbnail of this new Pixel Saturation Mask layer and select "Rasterise to Mask".
Parts of this pixel layer will now go slightly transparent. This is fine.
Step 13: in the Channels panel, right-click on the thumbnail labelled "Mask Alpha" and select "Create Spare Channel".
This stores the Saturation Mask as a Spare Channel, for later use.
Back in the Layers panel, you can now safely delete the "(Mask)" layer and the "Selective Colour Adjustment" layer.
Step 14: this is the final stretch. Right-click on the Spare Channel you created, which contains the image's Saturation Mask, and select "Load To Pixel Selection". You'll get some "marching ants" dancing around your image, indicating that a selection is active.
Step 15: with the selection active, create a Curves Adjustment layer and change its Colour Mode from RGB to LAB. This new layer will load the selection you've made onto the Curves Adjustment layer as a mask. In short, you've added the Saturation Mask onto the Curves Adjustment layer.
This now means that any adjustment you make to this Curves Adjustment layer will affect only the most saturated colours in the image, because this adjustment is controlled by the Saturation Mask attached to it.
Step 16: change the channel in the Curves Adjustment window from "Master" to "Lightness".
Step 17: create a point in the middle of the curve and drag it down to darken the tones.
Because the Curves Adjustment is in LAB colour mode, and we're editing the Lightness channel, the edit we're making to the curve is only affecting the image's Luma (lightness), and not touching any of the colours. Furthermore, because we have a Saturation Mask attached to the Curves Adjustment layer, this means we're darkening the brightness of only the most saturated colours in the image.
This is the Color Chrome effect.
Let's have a look at some comparisons, shall we?
Conclusion
Do you think this is an accurate replication of Fujifilm's in-built Color Chrome effect? Do let me know, especially if think any improvements can be made.
Free Downloads
If you use Affinity Photo, I've created some free Macros that will automate the creation of the LAB Colour Boost and the Saturation Mask, important steps to recreating this Color Chrome effect.
Download: LAB Colour Boost
Download: Saturation Mask